

In the evolving landscape of data management, ensuring secure and organized access to data assets is paramount. Azure Databricks, a unified data analytics platform, offers the Unity Catalog—a unified governance solution for all data and AI assets. When deploying Azure Databricks within a Virtual Network (VNet), it's crucial to understand the intricacies of setting up the Unity Catalog to maintain both security and efficiency.
This three-part blog series provides a comprehensive guide to setting up the Azure Databricks Unity Catalog within a VNet environment. The series covers aspects from the Unity Catalog's introduction, infrastructure and networking configurations to security, metastore setup and workspace integration.
- In Part 1, we provide an overview of the Unity Catalog and how to set it up.
- In Part 2, we cover the network setup process.
- Finally, in Part 3, we conclude the series by configuring the metastore.
Let's get started with Part 1.
Unity Catalog overview
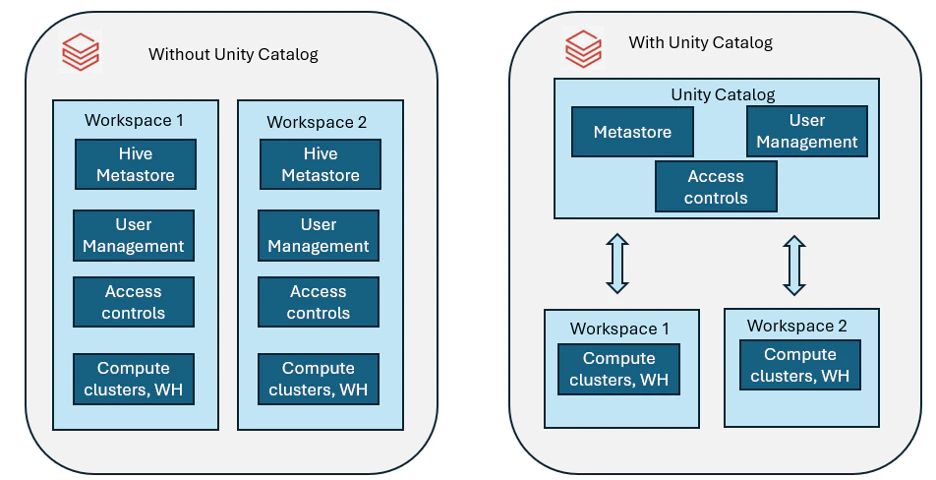
The Unity Catalog is a unified Azure Databricks governance solution that provides fine-grained data and AI assets governance. It offers a centralized place to administer and audit data access, simplifying security and governance. Key features include:
- Centralized governance: Manage access control for data assets across all workspaces.
- Data lineage: Track the flow of data across various processes.
- Fine-grained access control: Implement precise access permissions at the catalog, schema, table and column levels.
How to set up Unity Catalog
Prerequisites
- Azure Subscription with appropriate permissions
- Azure Databricks Premium or Enterprise workspace
- Azure account with Owner or Contributor permissions
- Azure Data Lake Storage Gen2 (ADLS Gen2) as an external metastore
- Azure Active Directory (Azure AD) permissions for managing access
Configure Databricks access connector to storage account and Unity Catalog

Databricks access connector is an Azure-managed identity that provides secure access to Azure data lake storage (ADLS Gen 2) without exposing credentials.
It allows Unity Catalog to read/write data from external storage securely.
Step 1: Create Data Connector
- Go to Azure portal -> Search Databricks Access Connector -> Click Create
- Enter details for Subscription, Resource Group, Name and Region
- Click Review + create -> Click Create
Step 2: Access to Data Connector
Now the access connector needs permission to access our ADLS Gen2 storage account.
- Go to Storage account -> Access Control (IAM) -> Add role assignment
- Assign the following role to the access connector
- Storage Blob Data Contributor (Allows read/write access)
- Select members -> Choose Databricks Access Connector -> Click Save
We now have our Unity Catalog created. The next big step is setting up the network. We'll cover that in Part 2 and then the megastore in Part 3.
