

This three-part blog series provides a comprehensive guide to setting up the Azure Databricks Unity Catalog within a VNet environment. The series covers aspects from the Unity Catalog's introduction, infrastructure and networking configurations to security, metastore setup and workspace integration.
- In Part 1, we provided an overview of the Unity Catalog and how to set it up.
- This blog—Part 2—covers the network setup process.
- Finally, in Part 3, we conclude the series by configuring the metastore.
Since we’ve already explored and established our Unity Catalog, let's now focus on the all-important network setup process.
Network setup
As an initial setup, we need to create a resource group for the network. Once the network RG is created, we can create the virtual network.
Creating the virtual network
On the home page, search virtual networks in the global search and click Create to create it.
- Under Subscription, select the name as per the project
- Under Resource group select the RG name as per the project
- Give the virtual network a name as per the nomenclature and select the region
- Click Next
In the IP addresses section, remove the default IP address and enter the procured IP address.
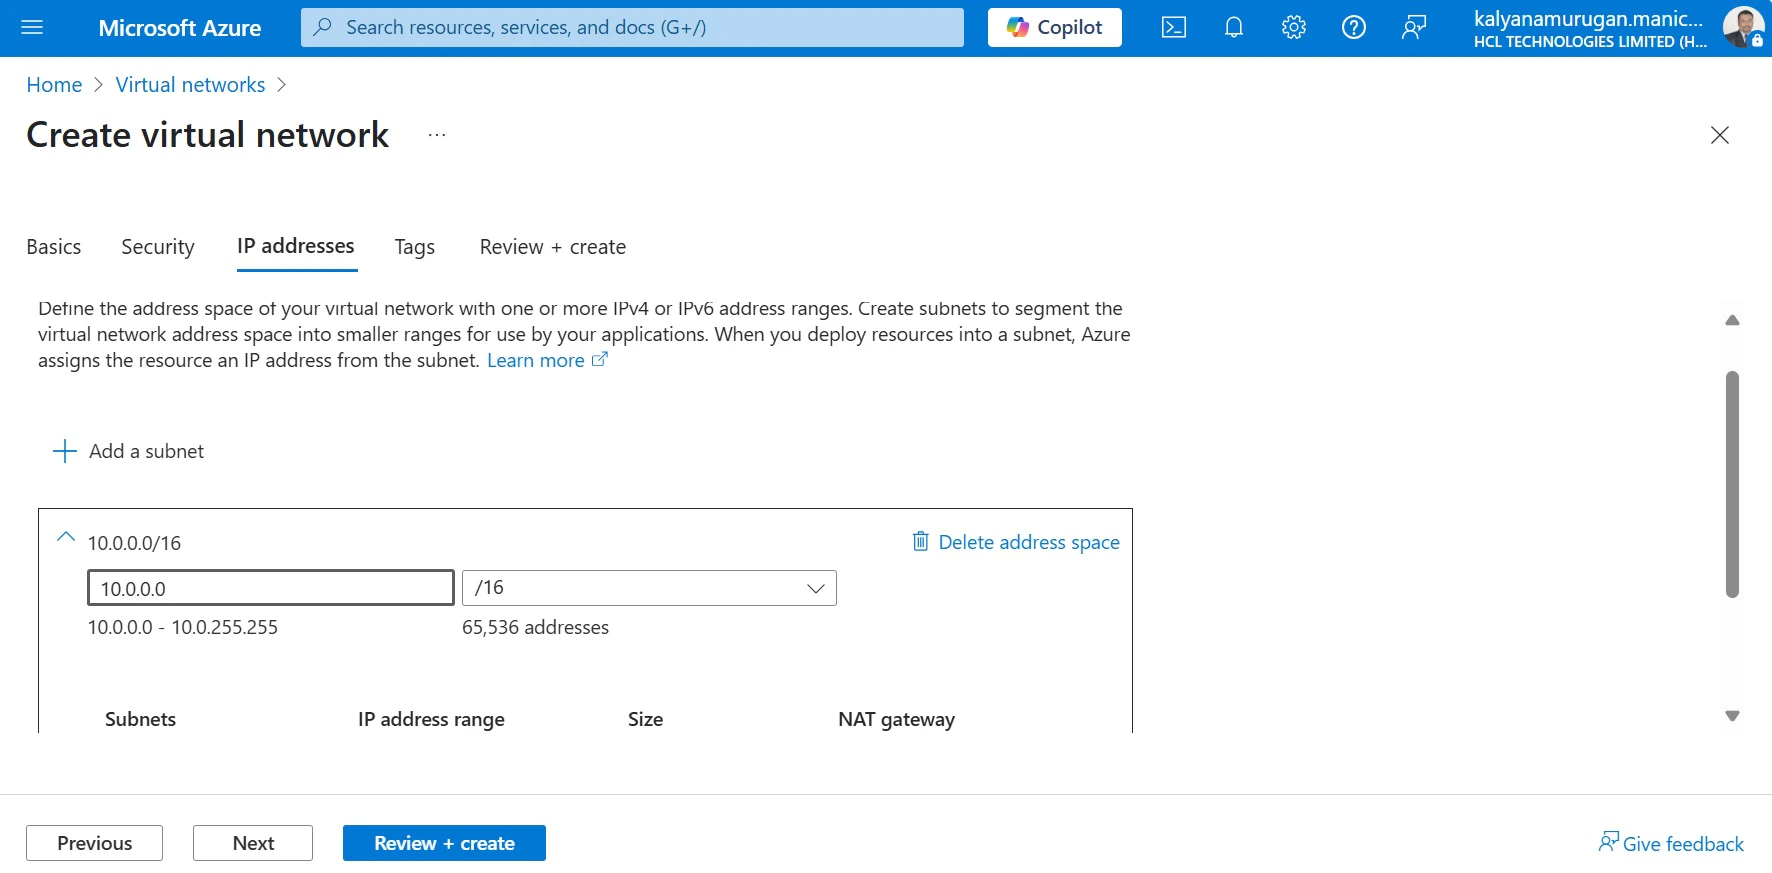
- After adding the IP address, delete the default subnet
- Click on Review + create for the validation
- Finally, click Create
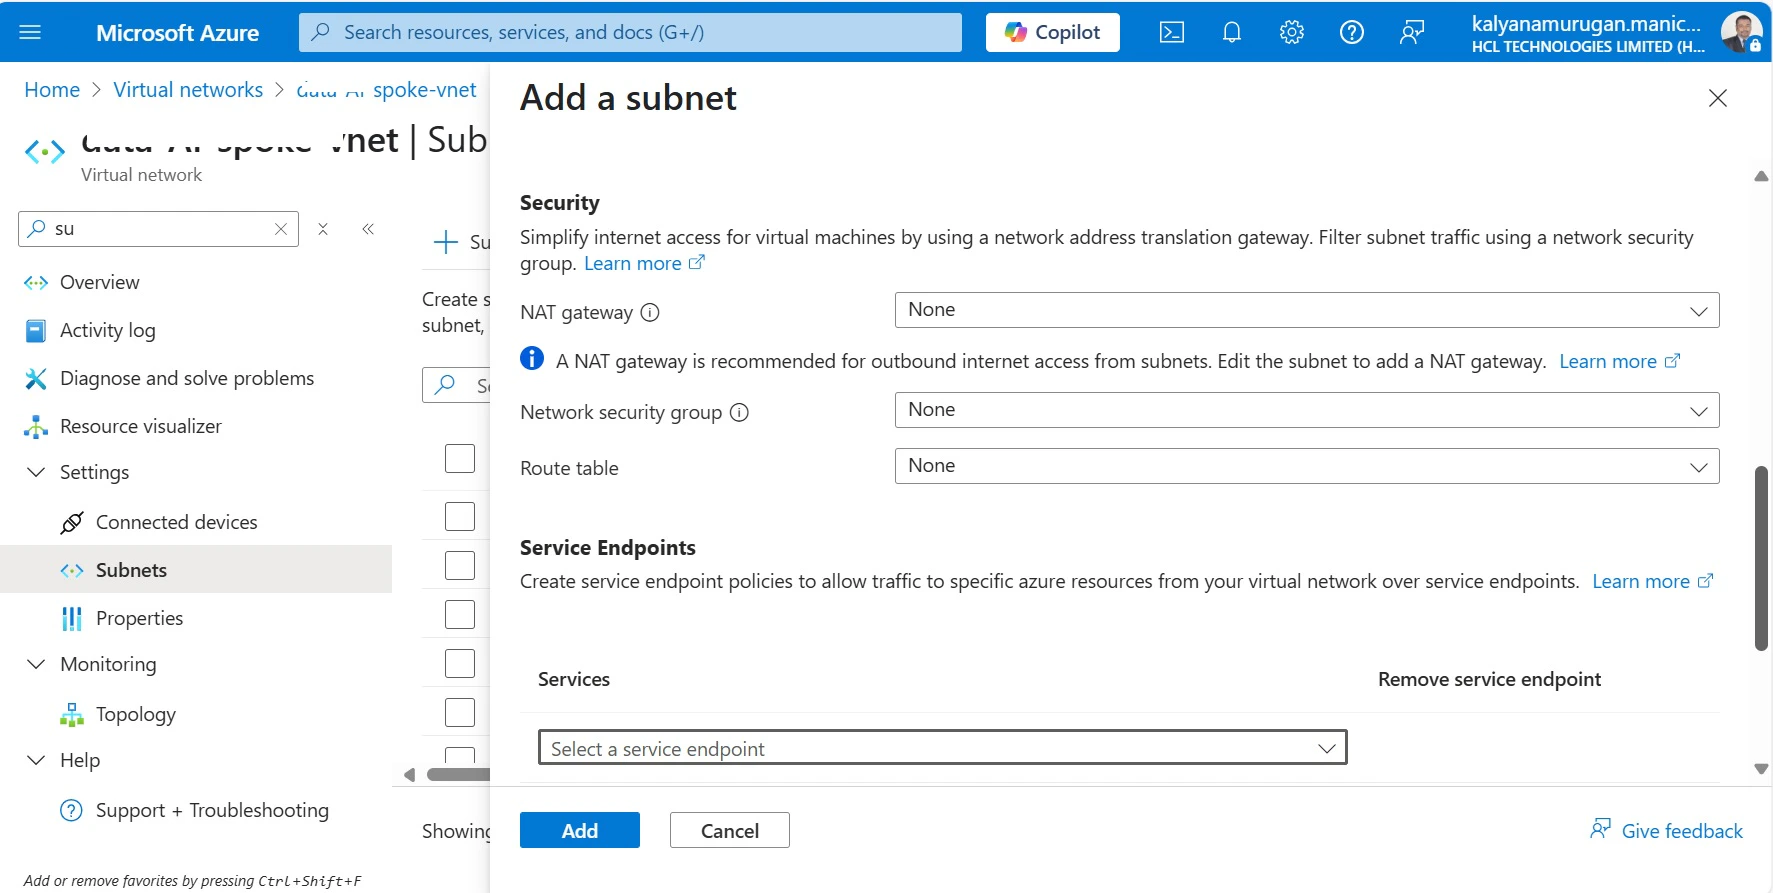
Creation of Subnet
- Under the created virtual network, select Subnets on the left panel
- Click on + Subnet to create a new one
- Provide the Subnet Name and Subnet address range
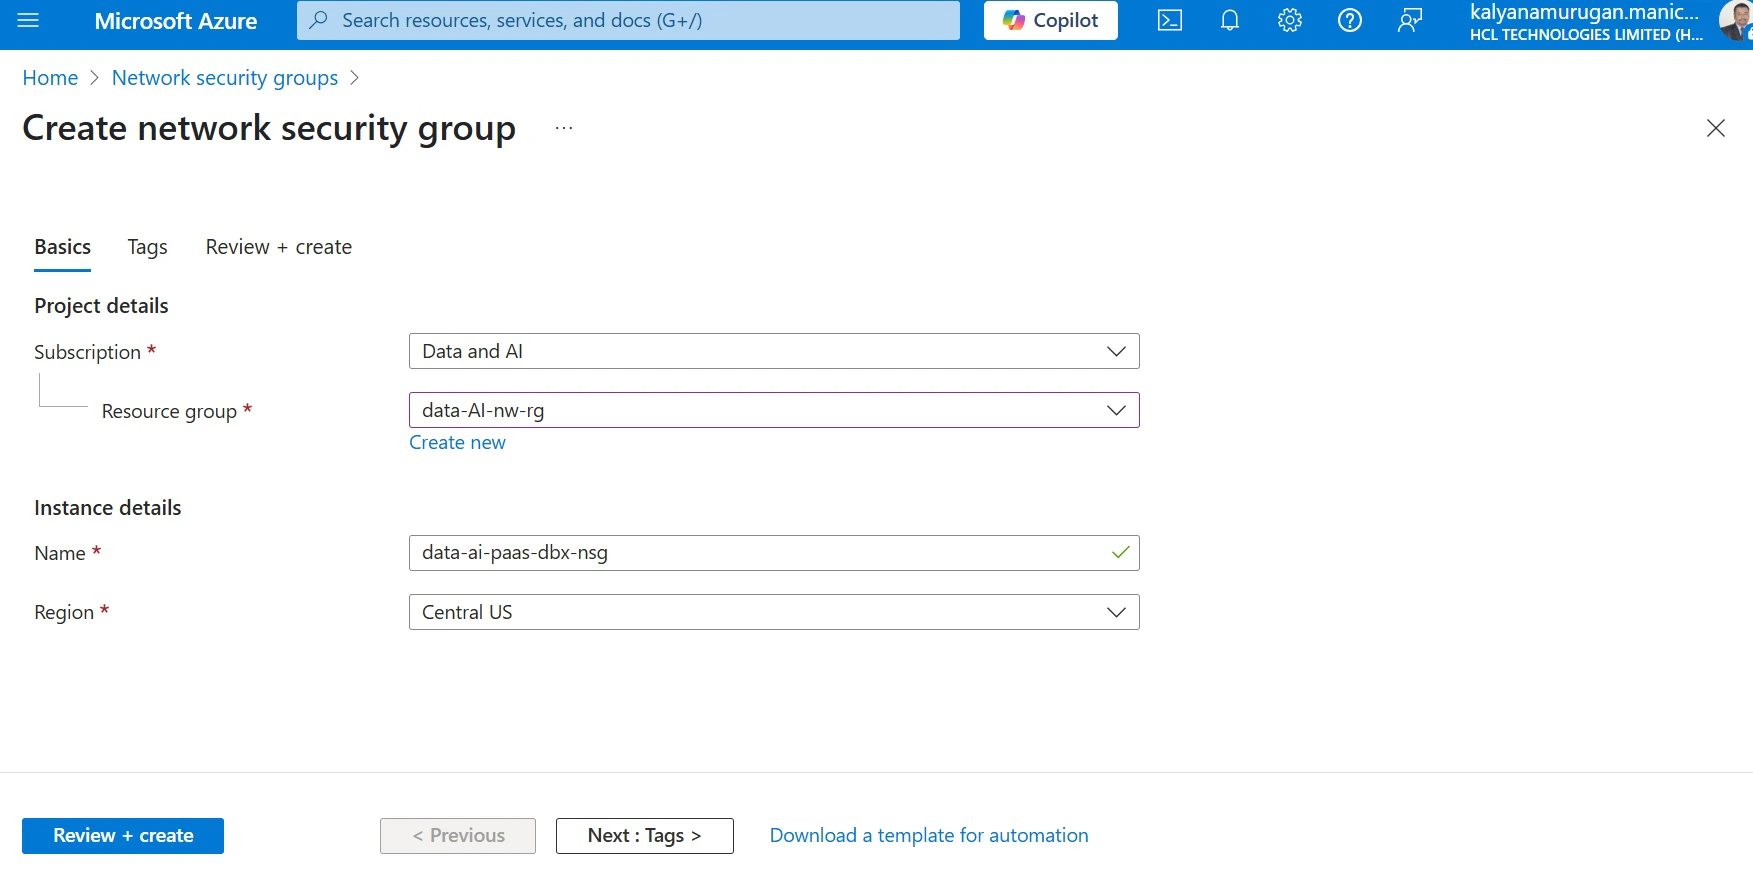
Creation of network security group (NSG)
- On global search, search network security group and click the icon
- To create NSG, click Create
- Under the Subscription, select the name (create as per project name)
- Under the Resource group, select the RG name
- Give the network security group a name as per the nomenclature and select the region
- Click Review + create for the validation
- Once deployment is complete, the NSG will be created
Storage configuration
Before proceeding with storage creation, a subnet is configured to delegate to the Storage Account.
Steps to create a storage account:
- Navigate to the Azure Portal and select Create a resource.
- In the Search the Marketplace box, type Storage Account and select it from the list.
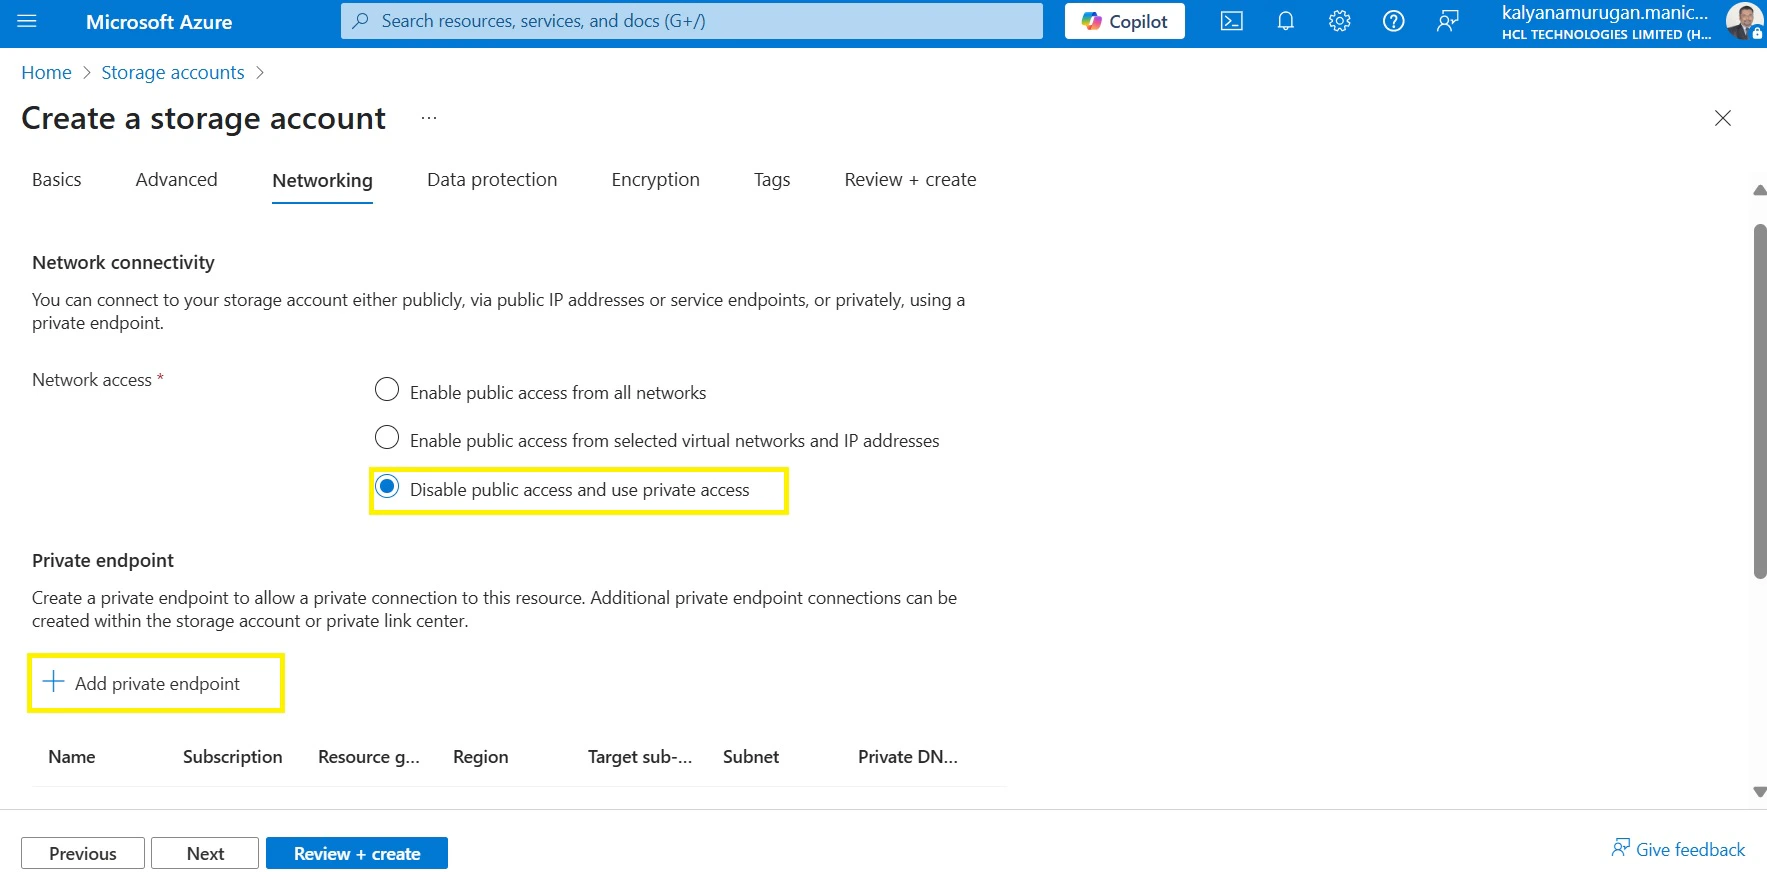
- Click create and provide information as per the requirements on the basics and advanced tabs.
- On the Networking tab, under Network access, select Disable public access and use private access.
- Click + Add private endpoint
Private endpoint
- Subscription: Select Subscription Name
- Resource Group: Create a new resource group or select an existing one
- Location: Select a location (e.g., Central US)
- Private Endpoint Name: Give a name to the private endpoint
- Storage subresource: This is the specific subresource for the new storage account that this private endpoint will be able to access—select accordingly
- Virtual Network: Select VNET
- Subnet: Select a subnet for the private endpoint
- Private DNS integration: Select No for now—we'll configure after private endpoint creation
- Routing preference: Select Microsoft Network Routing
- Data Protection: Configure as per your requirements
- Encryption: Configure as per your requirements
- Review + Create: Review the configurations and click Create
- DNS Configuration: For private endpoint
Next, go to the resource group in which the private endpoint was created, and click on the private endpoint, then click DNS Configuration.
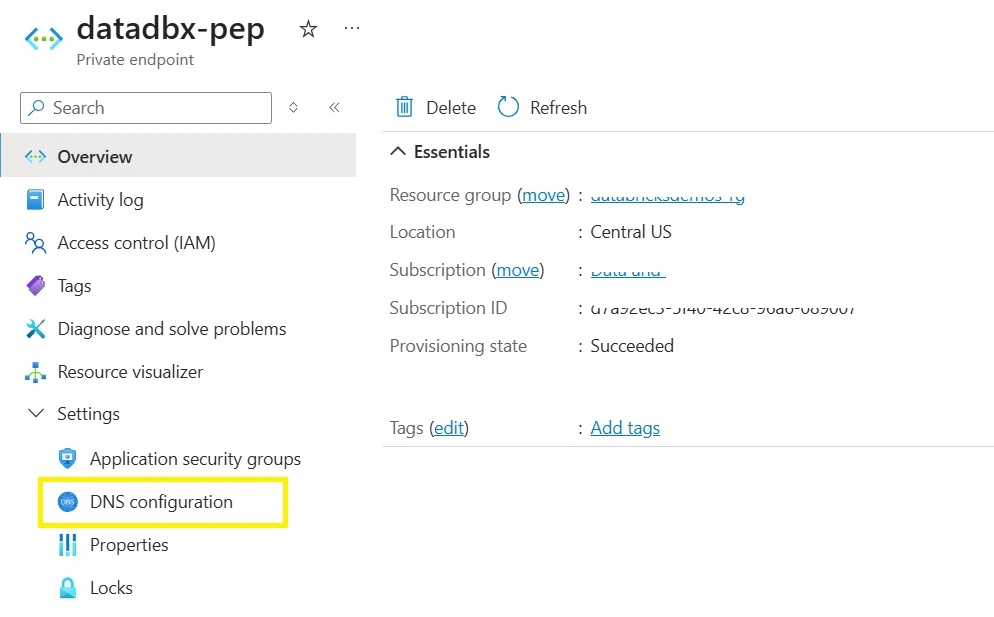
Click Add configuration.
- Select the subscription based on the location
- Select the DNS zone as per the resource type we are creating and click on Add
Storage configuration is now done, so let's move onto Databricks configuration.
Databricks configuration
Below is the list of prerequisites before deploying Databricks in an Azure virtual private network.
| Item | Details |
|---|---|
| Virtual Network | Virtual network to deploy Azure Databricks Data plane (a.k.a VNET Injection)—be sure to choose the right CIDR blocks |
| Subnets | Three subnets: Host (Public), Container (Private) and Private Endpoint Subnet (to hold private endpoints for the storage, dbfs and other azure services) |
| Route Tables | Channel egress traffic from the Databricks subnets to the network appliance, internet or on-prem data sources |
| Azure Firewall | Inspect any egress traffic and take actions per your allow/deny policies |
| Private DNS Zones | Provide reliable, secure DNS service to manage and resolve domain names in a virtual network (can be automatically created as part of the deployment if not available) |
| Azure Key Vault | Stores the CMK for encrypting DBFS, Managed Disk and Managed Services |
| Azure Databricks Access Connector | Required if enabling Unity Catalog to connect managed identities to an Azure Databricks account for the purpose of accessing data registered in Unity Catalog |
Azure Databricks supports two types of private link deployment.
Standard deployment (recommended): Databricks recommends using a separate private endpoint for front-end connection from a separate transit VNet for improved security.
Simplified deployment: Some organizations cannot use the standard deployment for various network policy reasons, such as disallowing multiple private endpoints or discouraging separate transit VNets.
The following diagram shows the network flow in a typical implementation of the recommended private link standard deployment:

Source: https://learn.microsoft.com/en-us/azure/databricks/security/network/classic/private-link-standard
Step 1: Deploy Databricks in VPN
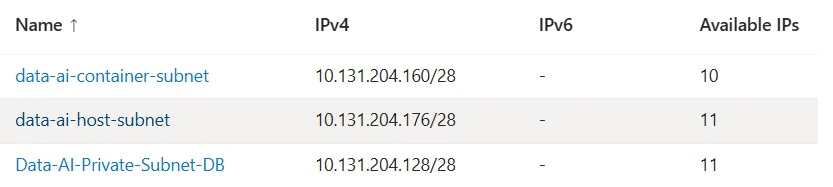
In a VNET, we need 3 subnets (host/public, container/private and private endpoint).
Create a Virtual Network (VNet) in a resource group with three subnets:
- Host (public) subnet – For workspace infrastructure
- Container (private) subnet – For Databricks cluster resources
- Private endpoint (PE) subnet – For secure access via Azure Private endpoint
Plan subnet sizing before deployment, because resizing or modifying is not possible once the Databricks workspace is deployed.
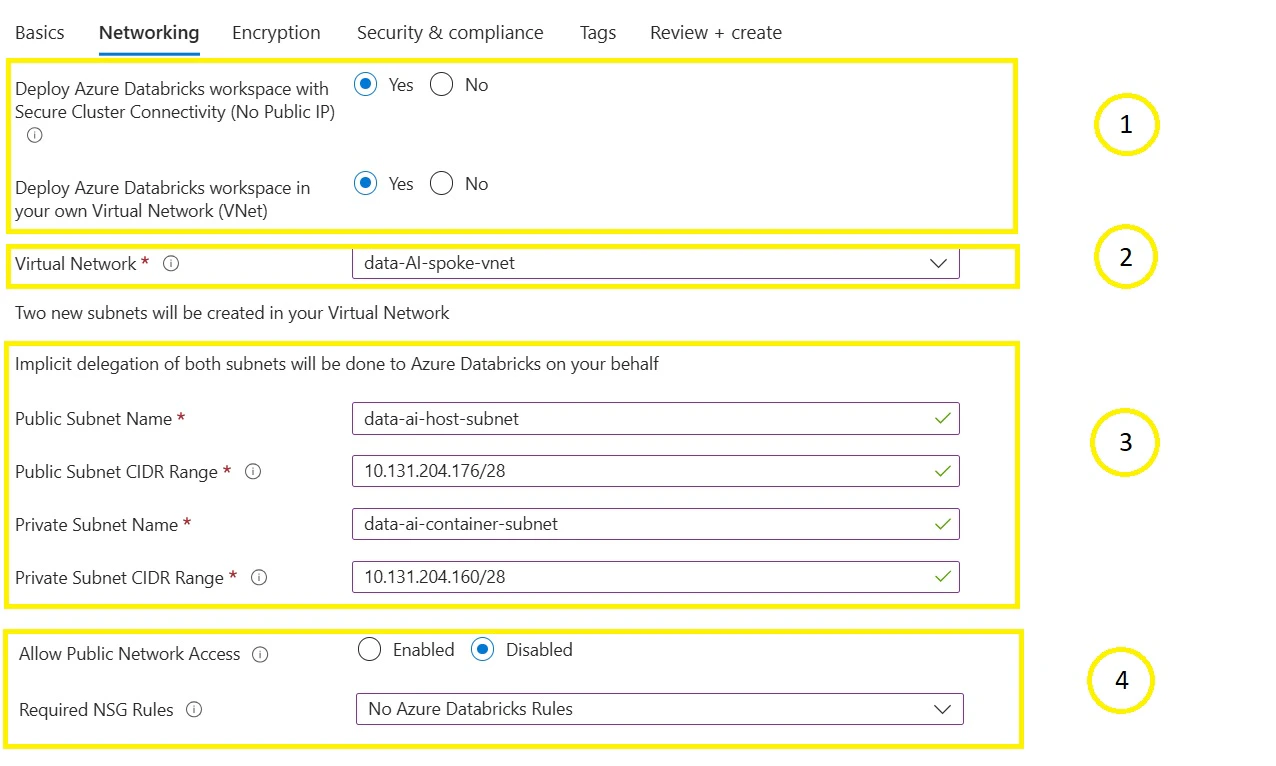
Configure the Databricks service from the Azure portal, as shown below:

- Click Review + create
Key considerations:
Choose SCC/NPIP and VNet injection
- Secure Cluster Connectivity (SCC) and No Public IP (NPIP) ensure private communication between Databricks clusters and the control plane
- Select the appropriate VNet where the Databricks workspace will be deployed
Subnet requirements
- Two dedicated subnets are required per workspace:
- Public subnet – Assigns a private IP for the cluster node’s host VM
- Private subnet – Assigns a private IP for the Databricks Runtime container
- Each cluster node will have two private IPs
- Subnet size range: /18 to /26 determined based on workload forecasts
- Address space should align with the enterprise networking strategy, even if non-RFC 1918 addresses are used
Subnet Delegation and NSG Rules
- If deploying via the Azure portal, Databricks automatically creates and delegates these subnets to Microsoft Databricks/workspaces.
- Network Security Groups (NSGs) are configured by Databricks, with prior notice for any updates.
- Pre-existing subnets can be used if they meet Databricks requirements.
Subnet and workspace mapping
- Each Databricks workspace requires its own subnet pair (public and private)
- Subnets cannot be resized once the workspace is deployed
- The deployment creates a managed resource group, which cannot be modified
Private link and security enhancements
- Private link support:
- Front-end: Disables public network access for user-to-workspace connections
- Back-end: Restricts control plane communication without public exposure
- Private Endpoints can be configured for a fully private Databricks deployment
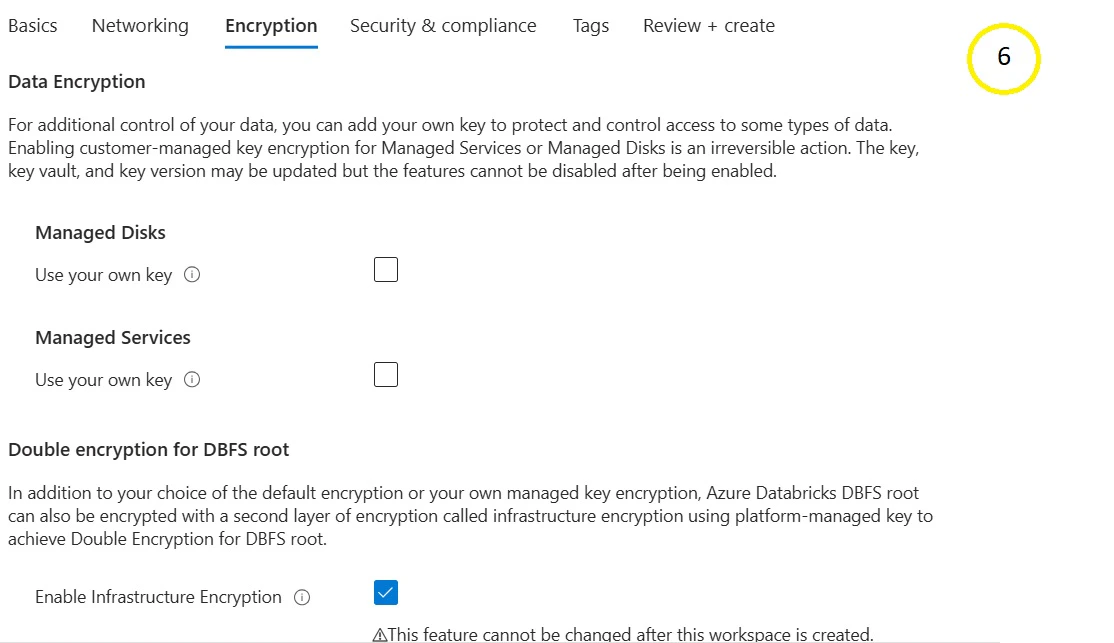
Encryption and data protection
- Enable Customer Managed Keys (CMK) for encrypting DBFS, managed services and disks for enhanced security
Network Security Rules:
Inbound Rules
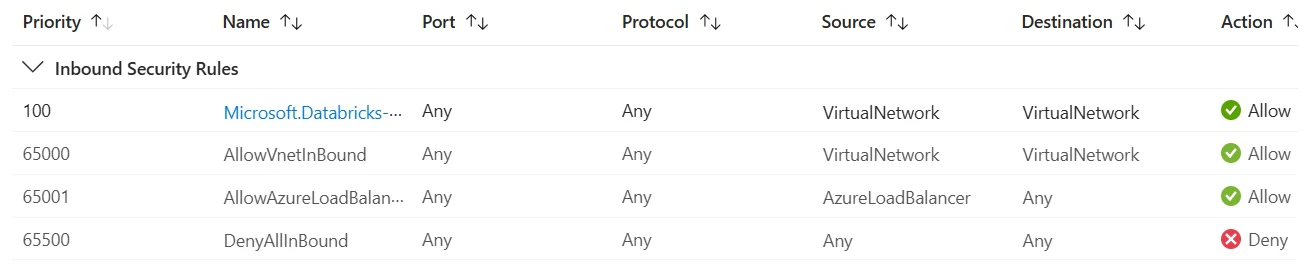
- Worker-to-worker communication - Enables traffic between cluster instances so that drivers and workers can communicate seamlessly
- Metastore access - Allows outbound traffic from the public subnet to the default Hive Metastore (HMS) for managing metadata
- Control plane access - Enables outbound traffic from the public subnet to the Databricks Control Plane, including:
- Secure cluster connectivity (SCC)
- Web applications (UI and APIs)
Note: The Azure Databricks service tag is not added to NSG rules if the back-end private link is enabled.
- Storage access - Allows outbound traffic from the public subnet to essential control plane storage assets like:
- Log storage
- Artifacts
- Databricks File System (DBFS)
- Additional ports for private link - Ports 443 and 6666 must be added for outbound traffic to the private endpoint subnet
- The same ports must be opened for inbound traffic in the private endpoint subnet’s NSG rules
Outbound Rules
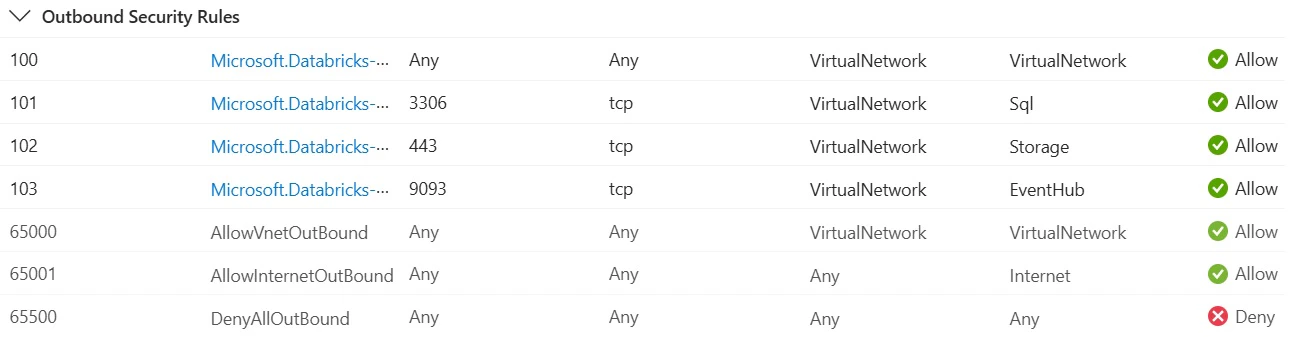
Outbound traffic rule (65001)
- By default, Rule 65001 allows egress to the internet when an NSG is created
- This behavior will later be overridden by routing all outbound traffic from Databricks subnets through a firewall, ensuring no direct access to the public internet
Step 2: Steps to configure NCC
Network connectivity configuration (NCC) is essential for establishing secure connections between the Databricks workspace and the serverless compute to ensure secure access to the storage account, especially when public network access is disabled.
- Launch Databricks workspace
- Click Manage account—go to the Unity Catalog admin console
- Click on Cloud resources
- Add Network Connectivity Configuration

- Add a name for the object and select the region
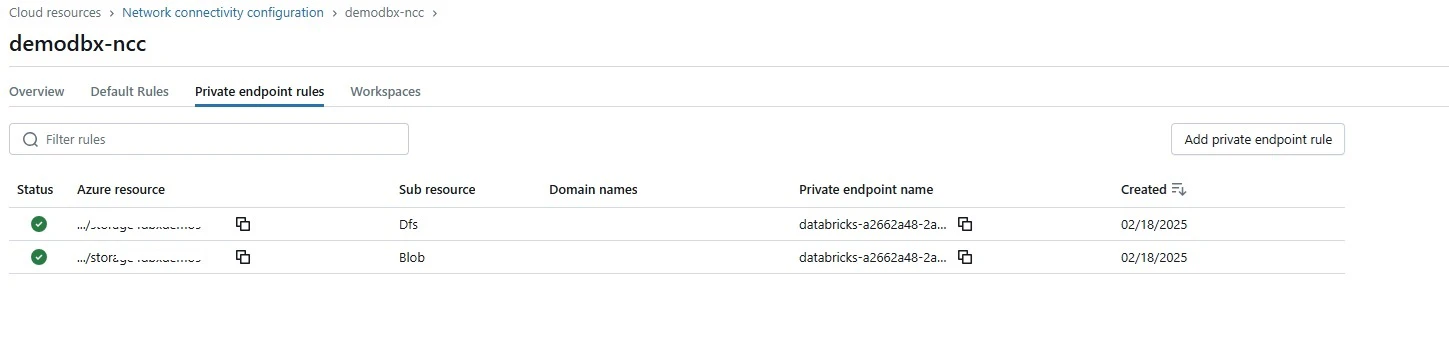
- After creating the NCC, go inside and click Private endpoint
- Add a private endpoint of type Dfs and Blob
- Add the resource ID of the storage account, and in the sub-resource type, add Dfs and Blob
Verify connectivity
- Test the connection by running a DML/DDL from the SQLwarehouse
- Ensure that the storage account's Firewalls and virtual networks settings allow access from the selected VNet and IP address
Recommendation: To ensure secure access to the storage account, it is recommended that private connectivity from serverless compute be configured.
Step 3: Deploy rules in Azure firewall
Create a network rule and application rule collection as follows. Note that the application rules are optional if the egress traffic is via UDR (discussed in the next section).
- Azure Databricks Service Tag is not required if private endpoints are enabled for the workspace
- Azure Databricks also makes additional calls to NTP service, CDN, Cloudflare, GPU drivers, and external storage for demo datasets, which need to be whitelisted appropriately
- Attach the firewall policy to the firewall
Step 4: Create user-defined routes (UDRs)
- At this point, most of the infrastructure setup for a secure, locked-down deployment has been completed. We now need to route appropriate traffic from Azure Databricks workspace subnets to the control plane and Azure firewall.
- Add routes in the Route table to forward all the traffic to the Virtual appliances (Azure firewall).
We did it! We're done configuring the network. We just have one step left: configuring metastore, which we cover in Part 3. See you there!
